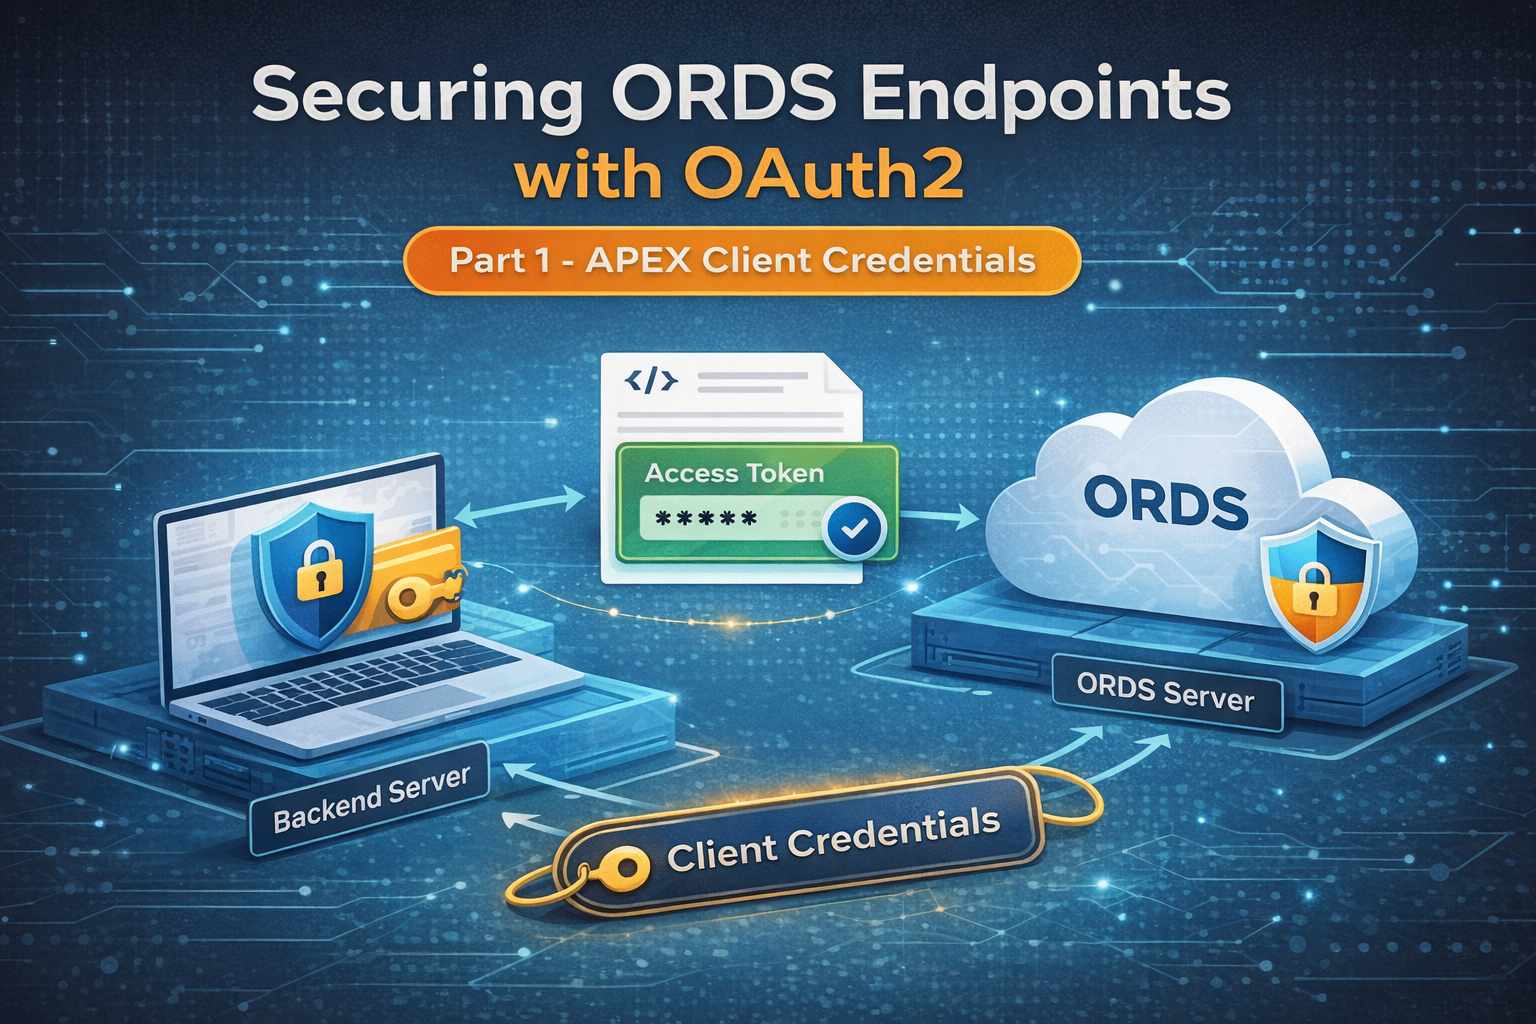
Securing ORDS Endpoints with OAuth2
Part 1 – Client Credentials in Oracle APEX (Autonomous Database)
By Dênio Flávio Garcia da Silva
If you work with ORDS long enough, you eventually realize something important:
By default, ORDS exposes your endpoints publicly.
When you create a REST module in APEX and publish it, that endpoint is accessible to anyone who knows the URL, unless you explicitly protect it.
That’s not a flaw. That’s how REST works. But in real-world applications, we rarely want public access.
We want control.
We want authentication.
We want authorization.
And that’s where OAuth2 comes in.
The Security Question
Imagine this scenario.
You distribute an application to multiple clients.
Every time the software starts, it needs to validate whether the client’s license is still valid.
You create an ORDS endpoint:
GET /ords/page/customers/validation/{id}
It works perfectly.
Until someone asks:
“What prevents anyone from calling this endpoint?”
That’s when you realize:
If you don’t configure security explicitly, the endpoint is public.
How ORDS Secures Endpoints
To protect an endpoint in ORDS, you typically:
- Create a Role
- Create a Privilege
- Map the privilege to either a Module or URI pattern
- Associate the role with OAuth clients
This is the security chain:
OAuth Client > Role > Privilege > Endpoint
No role? No privilege? No mapping?
Then your endpoint is public.
OAuth2 in ORDS – The Three Grant Types
When you create an OAuth client in ORDS, you must choose a grant type.
There are three common ones:
1) Client Credentials
- Used for machine-to-machine communication
- No human login involved
- The client (application) authenticates itself
- Ideal for backend services and integrations
2) Authorization Code
- Used when a real user logs in
- The token represents a user
- Supports redirect flow and refresh tokens
- Ideal for web and mobile apps
3) Implicit
- Older browser-based flow
- Token returned directly in redirect
- Not recommended for new projects
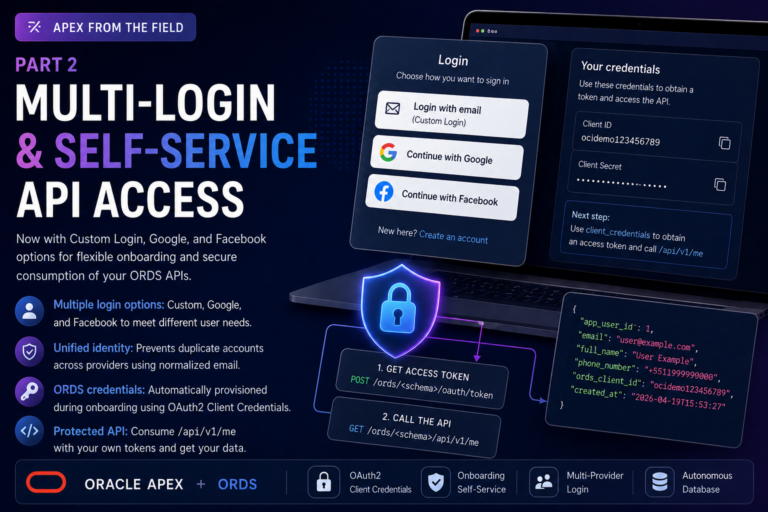
In this series, we’ll focus on the two relevant ones:
- Part 1 – Client Credentials (machine-to-machine)
- Part 2 – Authorization Code (user-based access)
This article covers Part 1.
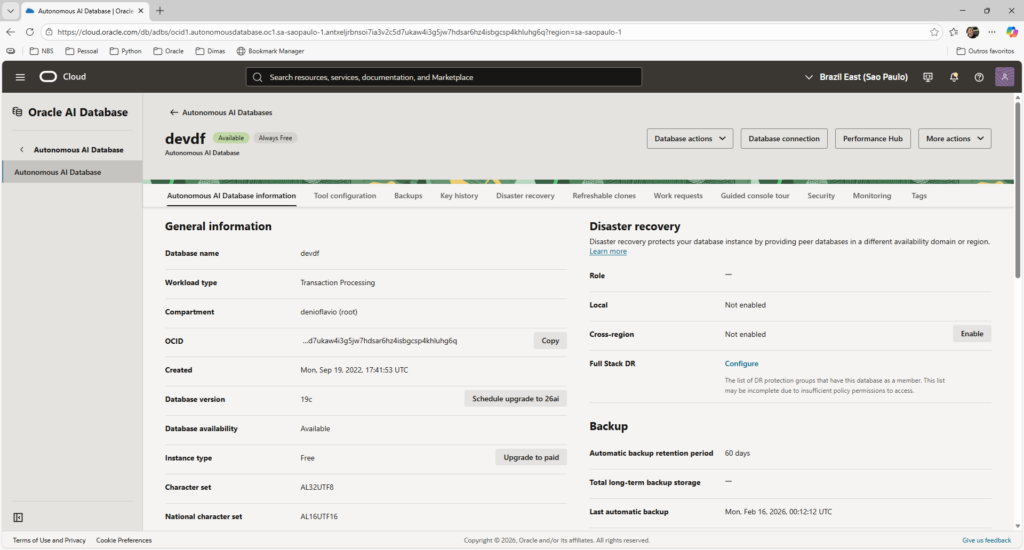
Environment Context
This demonstration was built using:
- Oracle Autonomous Database (ATP) on OCI
- ORDS managed natively by Autonomous
- Oracle APEX (RESTful Services interface)
- SQL Workshop inside APEX
- Postman for testing
OCI Console:
The Architecture (Why Client Credentials Makes Sense Here)
Let’s clarify something important.
A common mistake looks like this:
Desktop App > ORDS (OAuth secret embedded)
If you embed the CLIENT_SECRET inside distributed software, assume it will eventually be extracted.
Instead, the OAuth secret must live only on the server. The correct architecture is:
Desktop App > Backend Service (secrets) > ORDS
In this article, Postman is going to represent our backend service.man represents our backend service.
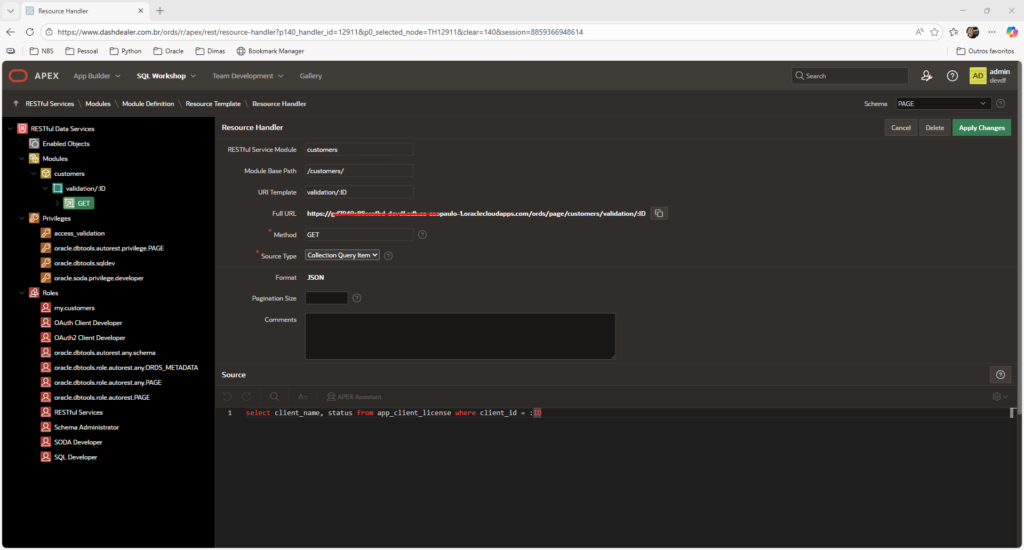
Existing REST Endpoint (Created via APEX)
For this example, I already created a REST endpoint that validates license expiration.
We won’t focus on table or module creation here, that’s not the goal.
The endpoint is:
GET /ords/page/customers/validation/{id}
Creating Role Using APEX Interface
Inside APEX:
Go to SQL Workshop > RESTful Services > Roles:
Create:
license_role

Creating Privilege Using APEX Interface
Now:
RESTful Services > Privileges
Create:
- Name:
license_priv - Associate Role:
license_role - Protected Modules: customers
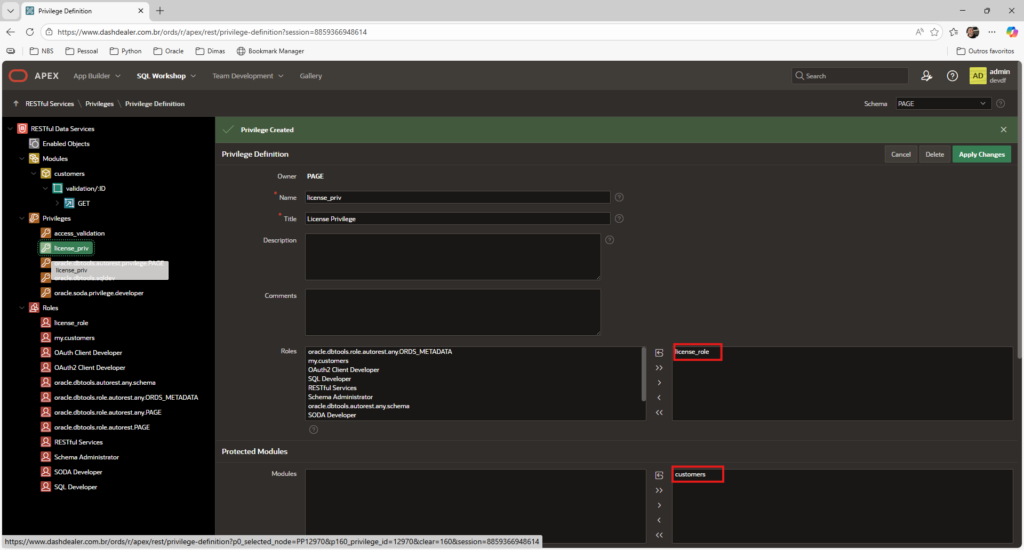
At this point, the endpoint is protected.
Testing Without Authentication
If you call the endpoint now:
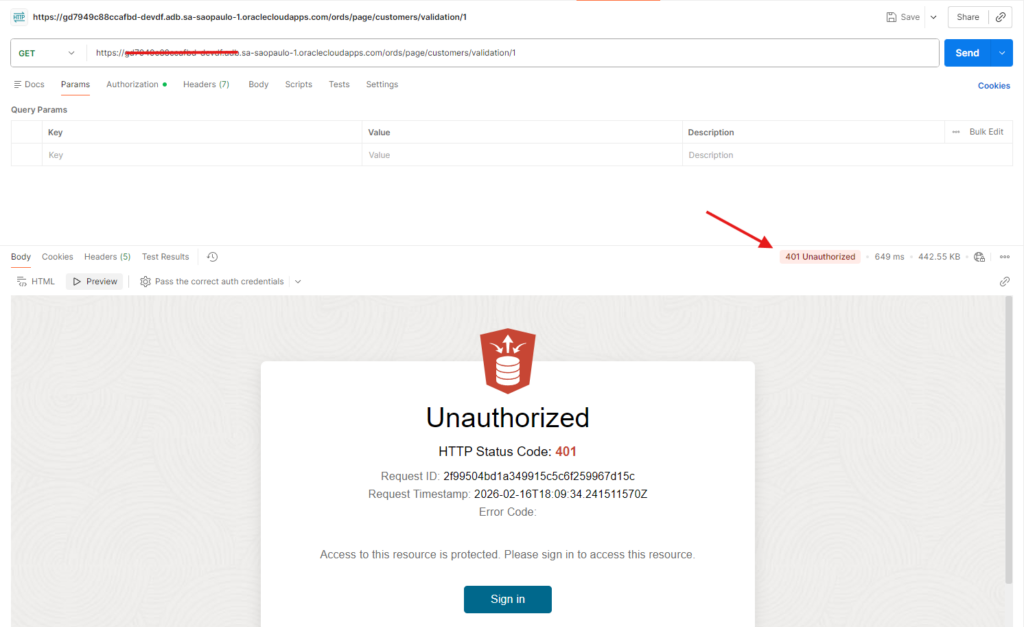
This confirms the privilege is active.
That’s exactly what we need.
Creating the OAuth Client (Only SQL Step)
OAuth clients cannot be created via APEX interface.
So we go to:
SQL Workshop > SQL Commands
Execute:
begin
  oauth.create_client(
    p_name            => 'license_backend_client',
    p_grant_type      => 'client_credentials',
    p_owner           => 'My Company',
    p_description     => 'Backend service for license validation',
    p_support_email   => 'support@mycompany.com',
    p_privilege_names => 'license_priv'
  );

  oauth.grant_client_role(
    p_client_name => 'license_backend_client',
    p_role_name   => 'license_role'
  );
  commit;
end;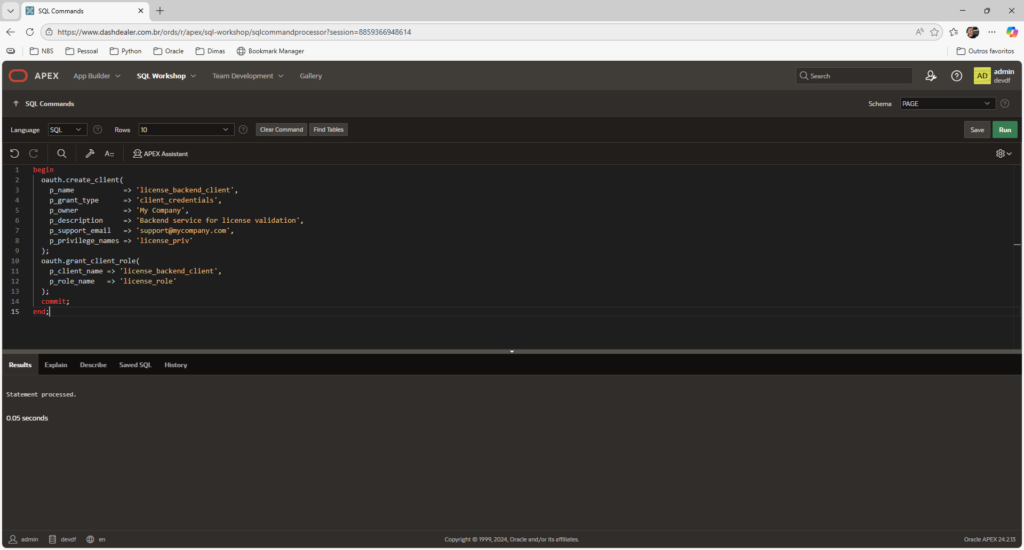
A Quick Note About Database Actions
In this article, I used SQL Workshop inside APEX to create the OAuth client, since the APEX RESTful Services interface does not provide a graphical option for OAuth client creation.
However, it’s worth mentioning that if you access your Autonomous Database through Database Actions (OCI interface), you do have graphical options to create:
- REST Modules
- Roles
- Privileges
- OAuth Clients
Database Actions provides a modern UI for managing ORDS objects without writing PL/SQL manually.
In a future post, I’ll demonstrate how to configure the same security setup entirely using Database Actions, no code required.
Retrieving Client Credentials
Still in SQL Workshop:
select client_id, client_secret
from user_ords_clients
where name = 'license_backend_client';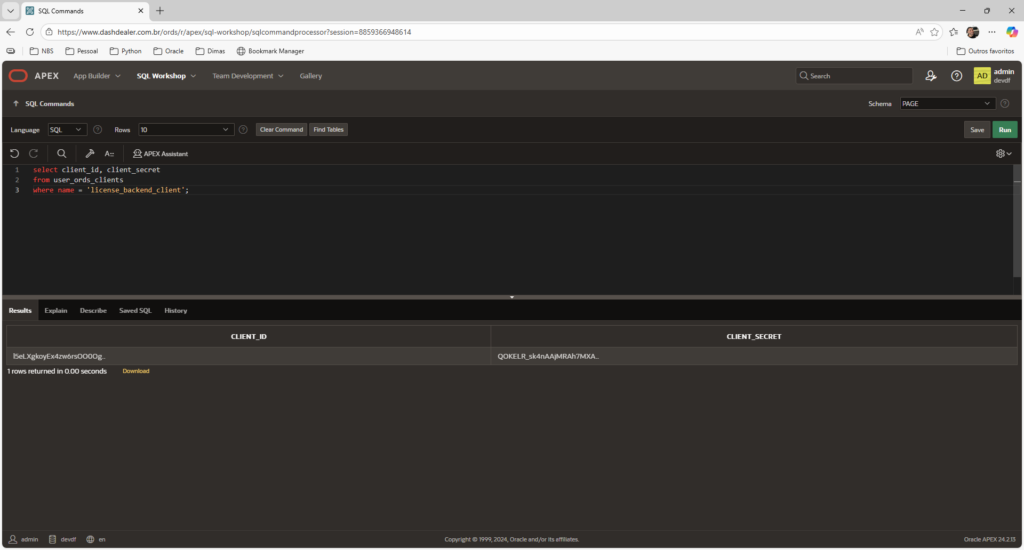
Take note from CLIENT_ID and CLIENT_SECRET returned, it will be our client credential.
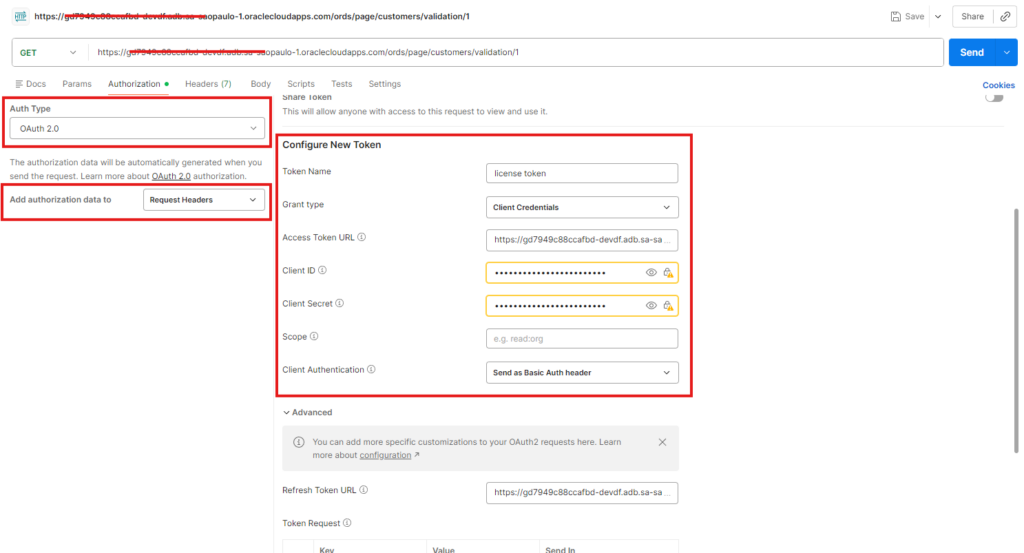
Simulating Backend with Postman
Step 1 – Request Access Token
Now we n eed to request new tokens using client credentials.
Here you have to make a GET request in the Access Token URL, wich follows the following pattern:
https://<adb-host>/ords/<schema-alias>/oauth/token
For example:
https://myadb.adb.region.oraclecloudapps.com/ords/page/oauth/token
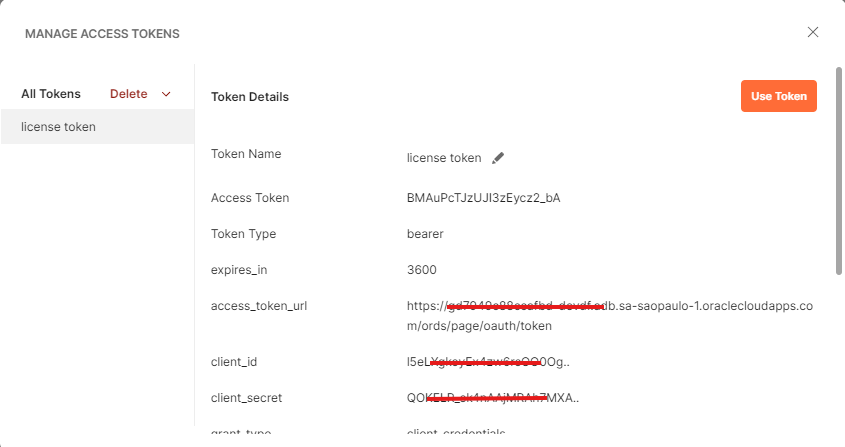
Scroll down and click ‘Get New Access Token’:

It will show a window with your new access token, click ‘Use Token’:
Step 2 – Call Protected Endpoint
Send a GET request to:
/ords/page/customers/validation/1
With the Header (automatically inserted by Postman) :
Authorization: Bearer <access_token>
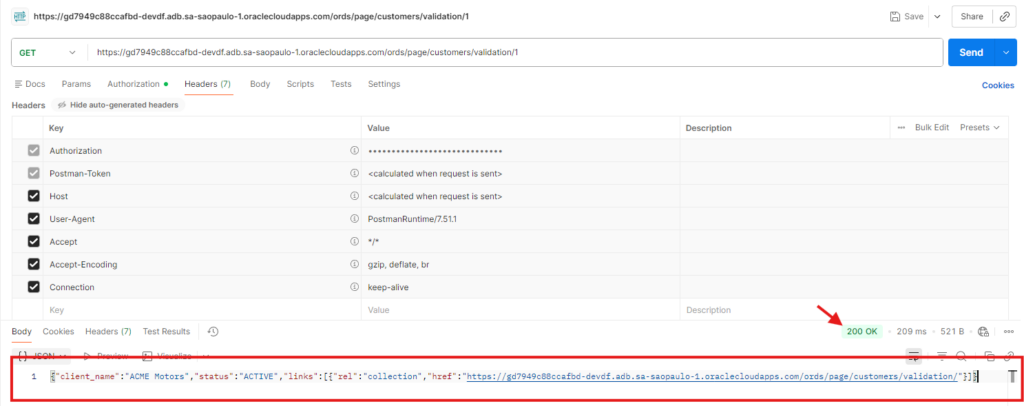
At this point, the flow works end-to-end.
What Just Happened (Clear and Practical)
- The backend authenticated itself using CLIENT_ID and CLIENT_SECRET.
- ORDS issued a token.
- The token represents the backend client.
- The protected resource was accessed.
No user login.
No redirect.
No browser interaction.
That is Client Credentials.
When to Use Client Credentials
Use it when:
- There is no human user
- One service calls another
- You control the server environment
- Secrets can be stored securely
Avoid it when:
- You need per-user permissions
- You distribute the secret in public software
- You need login-based identity
What’s Next
Client Credentials is perfect for machine-to-machine communication.
But what if you need:
- User authentication?
- User-based authorization?
- Per-user audit trail?
In the next article, we’ll explore the Authorization Code flow using APEX and ORDS.
And that’s where things become even more interesting.